Small Display Case | A Dad & Son Project!

I absolutely love that my son Ian came to me with a project idea that he wanted to build with me.

While the negative is that he broke his wrist a few months ago, after getting signatures from us, the kids at school and his teachers, it turned into a bit of a badge of honor. He got the idea for this project after seeing a trophy case, and wanted to build a display case for his cast. And as usual when he joins me in the shop while the camera is on, he is “the goofball”!

This was definitely some good quality dad/son time where he had fun and hopefully learned a few things along the way!

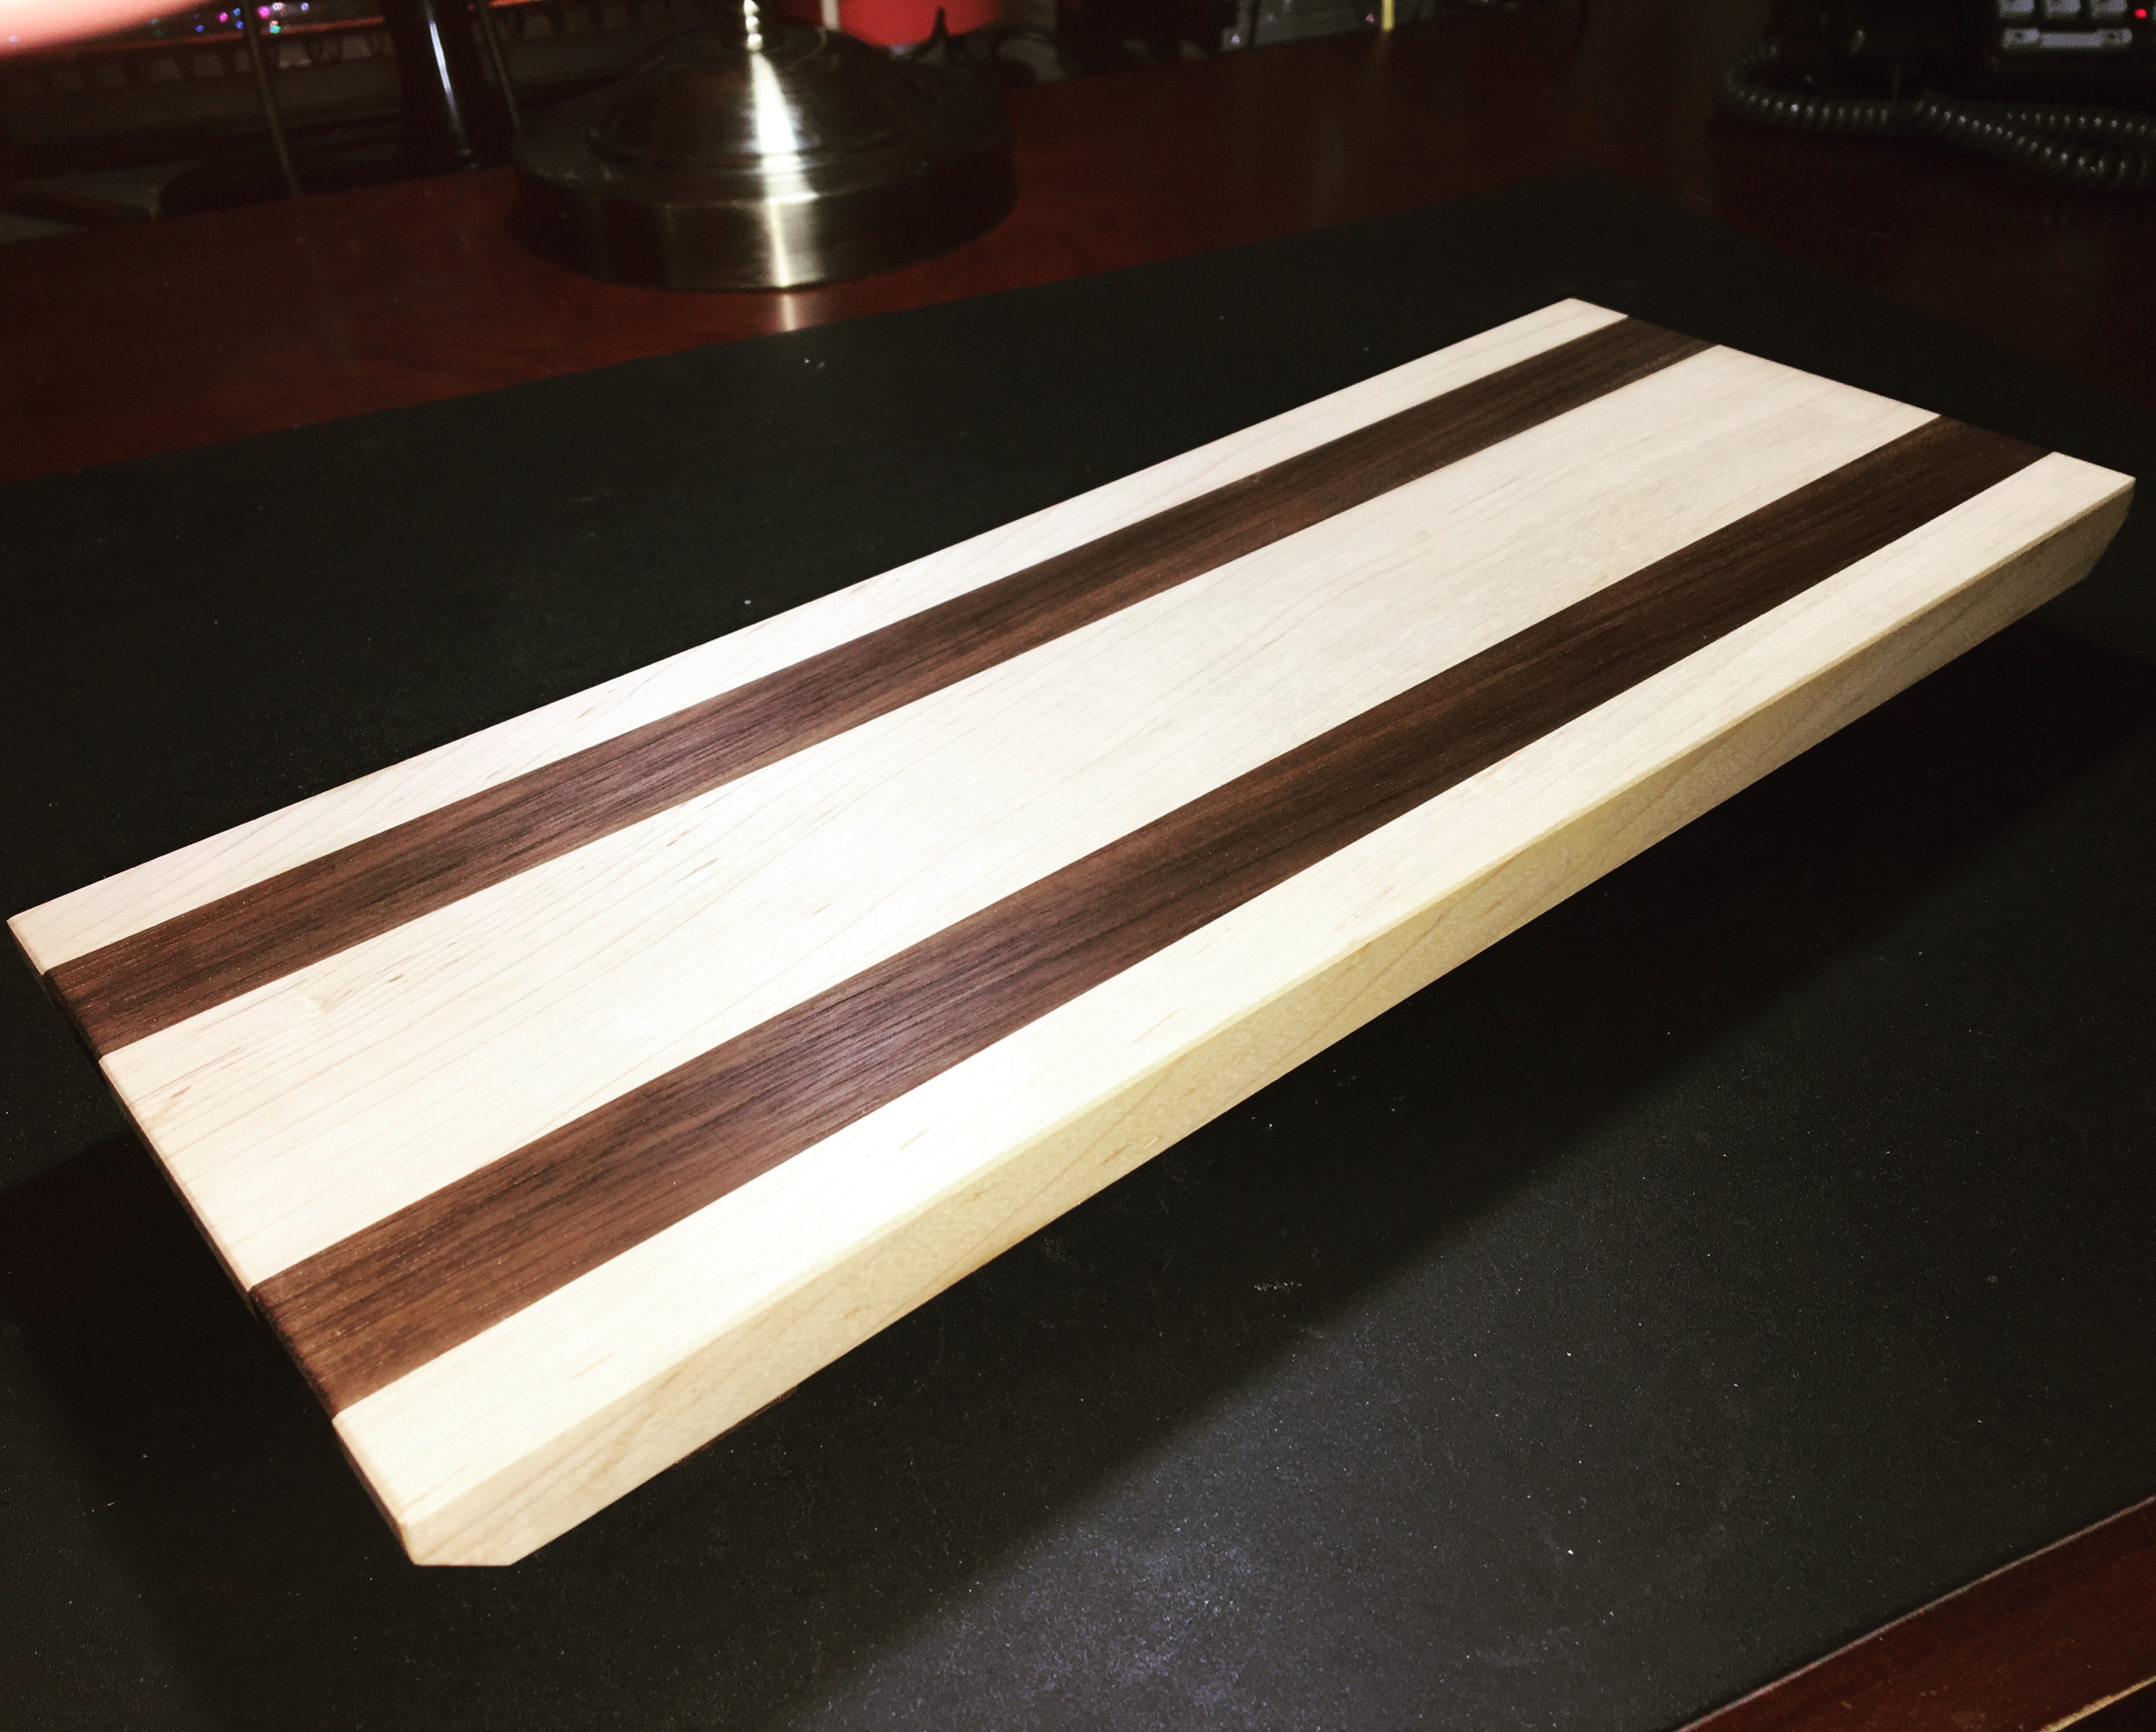
Sushi Cutting Board from David Picciuto’s ‘Make Your Own Cutting Boards’

As a wedding gift, I recently made the Sushi cutting board from David Picciuto’s book Make Your Own Cutting Boards: Smart Projects and Stylish Designs for a Hands-On Kitchen.

This cutting board really has an elegant design with an Eastern feel. The hard maple and walnut contrast nicely on a smaller project like this.

Sometimes, when shop time is at a premium, you’re really itching to use a particular tool. In this case I used my #4 smooth plane. It’s a joy to use and I believe it cut down the amount of time required to get to a smooth surface as opposed to going through each grit of sanding. I also eased many of the edges using my low angle block plane.

Buy David’s book on Amazon! – https://www.amazon.com/dp/1940611458/ref=cm_sw_r_tw_dp_x_G3ZdzbEH48A0A

Check out more of David’s work at Make Something:
https://makesomething.tv/
https://www.youtube.com/user/DrunkenWoodworker


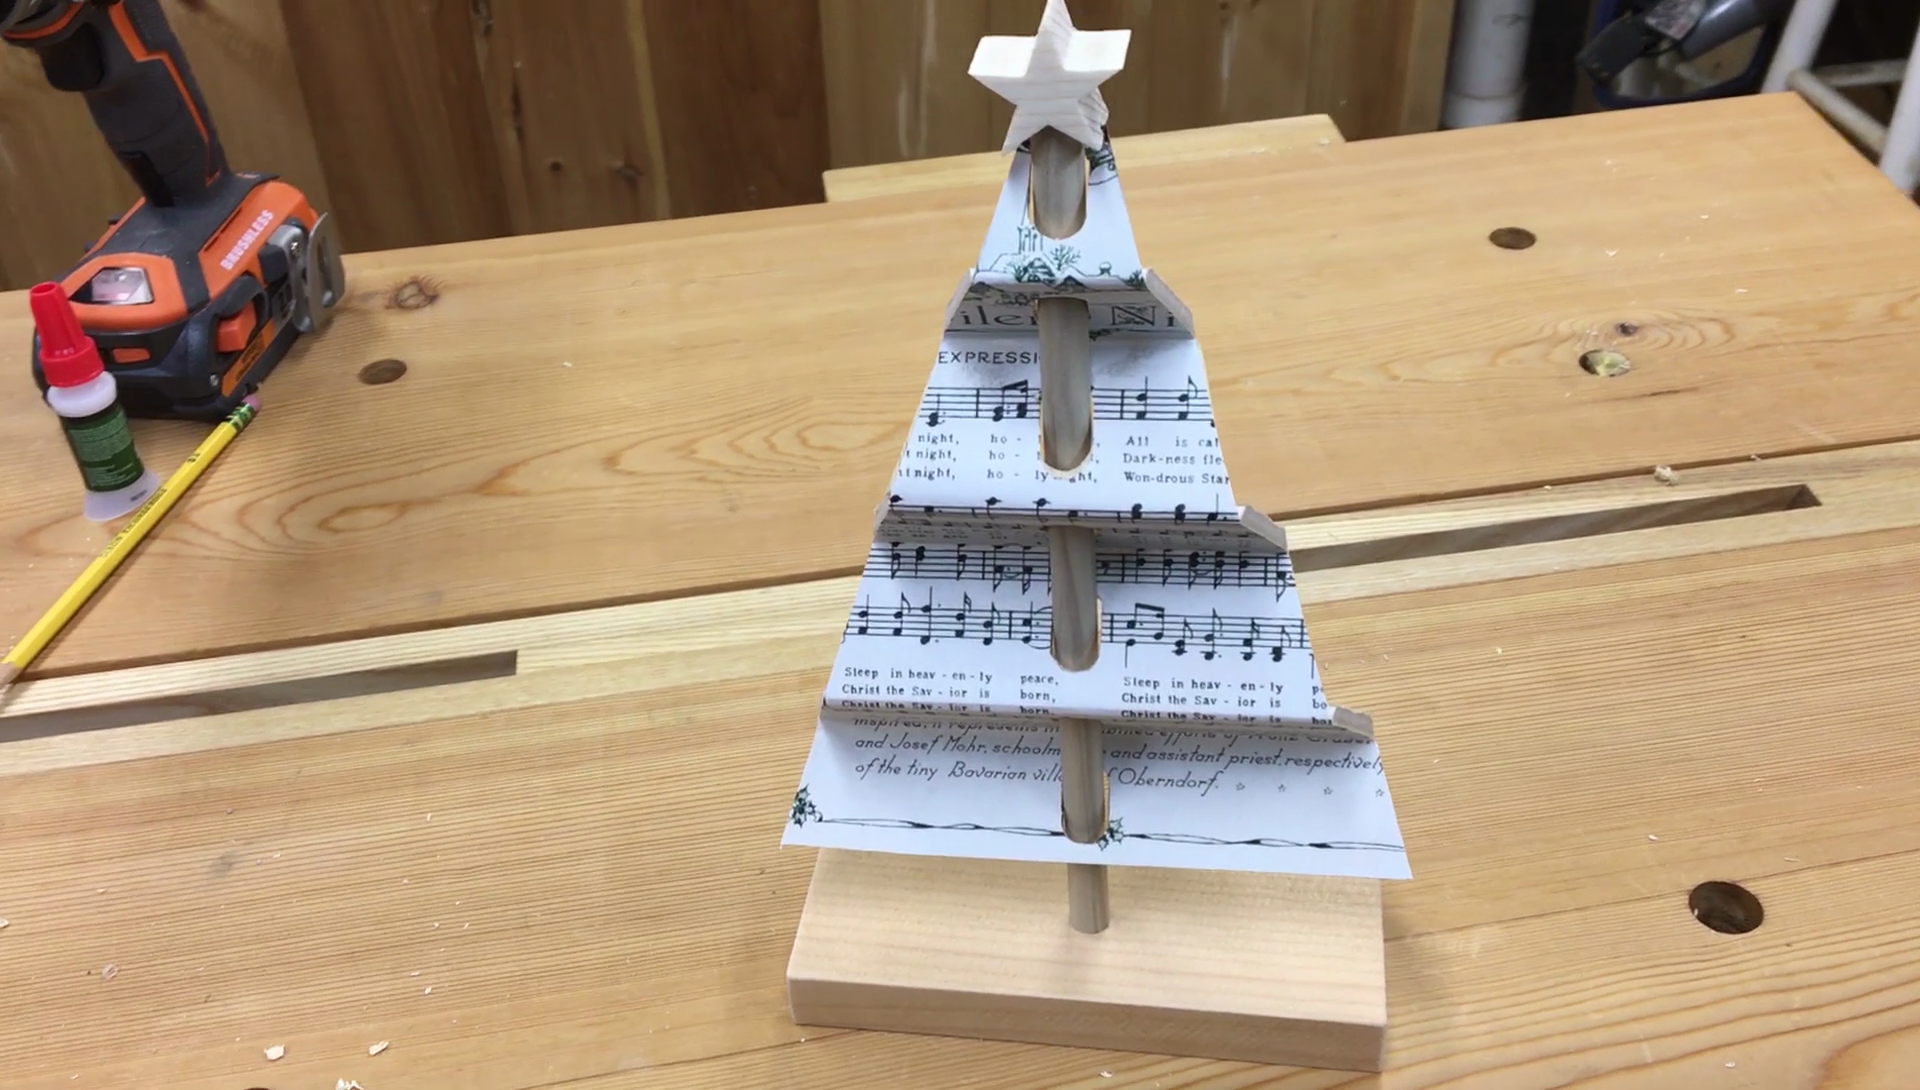
Accordion Style Christmas Tree Decoration

Shop time has been a bit in short supply lately. I had a couple of days off this week where I was able to spend some quality time there finally.

Sometimes a small, easy project is great to get back into the groove and get a feeling of accomplishment that you got to finish something. In this video, I make a small Christmas Tree decoration that has an accordion style to it. To make it more interesting, I adhered sheet music of “Silent Night” to it.

After a mistake and redo, I finished the project, and then celebrated in a fashion that I think Nick Offerman would approve.

Books seen:
Good Clean Fun: Misadventures in Sawdust at Offerman Woodshop by Nick Offerman.

Hybrid Woodworking: Blending Power & Hand Tools for Quick, Quality Furniture by Marc Spagnuolo.

Make Your Own Cutting Boards: Smart Projects & Stylish Designs for a Hands-On Kitchen by David Picciuto.

The Minimalist Woodworker: Essential Tools and Smart Shop Ideas for Building with Less by Vic Tesolin.

Nick Offerman’s original Yule Log video.

(** Please drink responsibly **)

Waffle Trivets – Last Minute Elf 2013

RunningElf

I was thinking about what sort of Christmas gifts I might make this year, especially since I did not get time to do any last year. Then, when Tom over at Tom’s Workbench introduced The Last Minute Elf, I  thought it was a great way to generate some ideas for folks on what they could build.

I had some walnut left over from the puja table I did last year, enough to make about five 7″ square pieces to make into trivets.

IMG_20131119_190310

Now, to make the numbers easy, I installed my fairly new dado stack (yes I finally got one, instead of doing dados as multiple passes with a standard blade) set to 1/2″ thickness. I then set the height to just a hair over half the thickness of the piece (so for a 3/4″ piece, I set the height to just a hair over 3/8″).

I then found the middle of the piece, 3 1/2″, and cut one dado so that the middle of the dado was the middle of the piece. Then I flipped the piece over, turned it 90 degrees and made the next cut, so what you have is a dado on each side that are perpendicular to each other.

Next, I moved the fence out 1″ (twice the distance of the dado thickness), and made a parallel cut on the same face I just cut, turned the piece 180 degrees, without flipping it over, to make another parallel cut. So  this  then makes 3 parallel dados on one face. Flip the piece over and make parallel cuts on the other face to the initial one made, so that face then has three dado cuts. Move the fence out one more inch, rinse and repeat, so that you have five parallel cuts  on each face that are perpendicular to their opposing face.

IMG_20131202_145228

It’s actually more to describe in words than it is to actually do. I left the edges with a more substantial border since giving it another groove would look odd, and put it too near the edge, or at the edge.

Next steps will be to break all the edges and do a normal sanding routine. Also, from what I’ve read, it’s something you can elect to not do a finish on, since hot items off the stove could react and damage finish anyway. (I haven’t personally tried this, but might be a good experiment.)

These only took  a short time to make, so perhaps give them a shot if you are looking for a quick project idea to give out as gifts!

Before “The Beginning”… The Woodworking Bug That Bit

When looking at what gets people interested in woodworking, it’s probably a true statement that many of us get “bit by the bug” with DIY projects around the house. I’m not an exception here. One of the bigger projects thus far in our house was when we had to get the other upstairs bedroom ready for our son. Of course, I didn’t have the foresight to take “before” pics, and wished I did. After all was said and done, it would have been nice to put the before and after pics side by side. The room also took longer than planned since my son had to be born 10 weeks early, which meant the room had to be finished after he came home – a two month hiatus where our routine was going to the NICU daily at Brigham & Women’s Hospital in Boston – certainly no time for projects.

And now here we are a few years later and thought it would be cool to document one part of this project that used some basic woodworking concepts. Our house is old, as mentioned in a previous post, built in 1860. Old houses have their challenges, but also opportunities to be creative in solutions. In his room were a couple of doors leading into crawl spaces and there was a TV from probably the 1950s or 60s built into the wall! The TV was non-operational and useless. For the door openings to the crawl spaces, all I could imagine is what sort of trouble he could get into in the crawl spaces when he got old enough. The room is small too, so any extra storage spots would come in handy. So I came up with some basic boxes in the wall. They would seal off the openings, yet use what would otherwise be wasted space.

Materials used were 1/2″ birch plywood, and moldings to face off and hide the ply layers. Joinery was simple as well – butt joints reinforced by brad nails. All in all a simple project but one that helped add some needed storage space and it’s one of the projects I can honestly say I can point back to as one that really got me interested in more woodworking!

Boxesinwall1

These two boxes on top of one another were where the built in TV were. The top was the TV, and the bottom was the speaker unit.

Boxesinwall2

This is where one of the doors to the crawl space was. This box is now currently used to hold some of his children’s books.